Setup OpenVPN Server in a VM to Access Your Home Network
OpenVPN allows you to connect to your home network remotely.
In this guide:
- Setting up VM
- Installing OpenVPN
- Adding and revoking clients
- Troubleshoot
Setting up VM
In this guide, I will be using a Virtual Machine with Debian Linux minimal installation. To install the minimal installation, download the ISO image from the official Debian website.
Here is my Virtual Machine specification. You can either go for a higher or lower specification.
- CPU - 1 core
- RAM - 512 MB
- Storage - 2 GB
- Network Interface -> Set to bridging and set the IP address to static.
You will need to port forward the UDP VPN port at your home router. - USB - 2.0 Compatibility
- Sound card - Removed
- Printer - Removed
- Display - Basic, no 3D acceleration
If you prefer to install the GUI, please select your preferred desktop environment on this screen shown below. I strongly discourage installing it as you can free up more resources in your hypervisor and allocate them to other services.

Continue installing the VM before proceeding to the next step.
Installing OpenVPN
We will be using the installation script by a Github user, angristan.
Step 1: Login into the VM
By default, the Debian minimal installation does not allow ssh as root. You may skip this step if you want to continue logged in as root.
From your hypervisor UI, you have to console into the Debian VM and log in as root.
Check that the command sudo is installed by executing the command sudo. Install sudo if command not found.
sudo: command not foundsudo is not installedapt install sudosudo if command not foundIf no normal user account was created during the installation, please refer to this guide below on how to create a user account with sudo access.

For more info about the risk of using a root account, you can read more using the link below.

Step 2: Installing OpenVPN Server
Once you successfully login as a normal user with sudo access, update the VM.
sudo apt update && sudo apt upgrade -yInstall Curl.
sudo apt install curlDownload the script and make it executable.
curl -O https://raw.githubusercontent.com/angristan/openvpn-install/master/openvpn-install.sh
chmod +x openvpn-install.sh
Then run it with sudo.
sudo ./openvpn-install.shThe script will prompt you for the setting required. If you are unsure, you can use the default value it provides and press ENTER.
If you are hosting a local DNS server such as pi.hole, select option 13 and provide the IP address of the DNS server on this screen.
What DNS resolvers do you want to use with the VPN?
   1) Current system resolvers (from /etc/resolv.conf)
   2) Self-hosted DNS Resolver (Unbound)
   3) Cloudflare (Anycast: worldwide)
   4) Quad9 (Anycast: worldwide)
   5) Quad9 uncensored (Anycast: worldwide)
   6) FDN (France)
   7) DNS.WATCH (Germany)
   8) OpenDNS (Anycast: worldwide)
   9) Google (Anycast: worldwide)
   10) Yandex Basic (Russia)
   11) AdGuard DNS (Anycast: worldwide)
   12) NextDNS (Anycast: worldwide)
   13) Custom
DNS [1-12]: 13
Primary DNS: [DNS IP Address]
Step 3: Setting up your first client
Please choose a meaningful client name to identify the device. Each configuration file can only be used for one device.
Tell me a name for the client.
The name must consist of alphanumeric character. It may also include an underscore or a dash.
Client name: [client-name]
Step 4: Retrieving the .ovpn file from the server
The default output directory of the .ovpn file is at the user home directory, ~/ or /home/<user>/.
You can retrieve the file by using scp command from your windows machine. Open up a terminal at Windows. Replace the username with your username, ipaddress with your OpenVPN server IP and client-name with your client name.
# Change the directory for the file to get downloaded
# The command below will set your Download folder as the directory
cd ~/Download

# Download the .ovpn file
# Format: scp [source] [dest]
scp username@ipaddress:~/client-name.ovpn ./
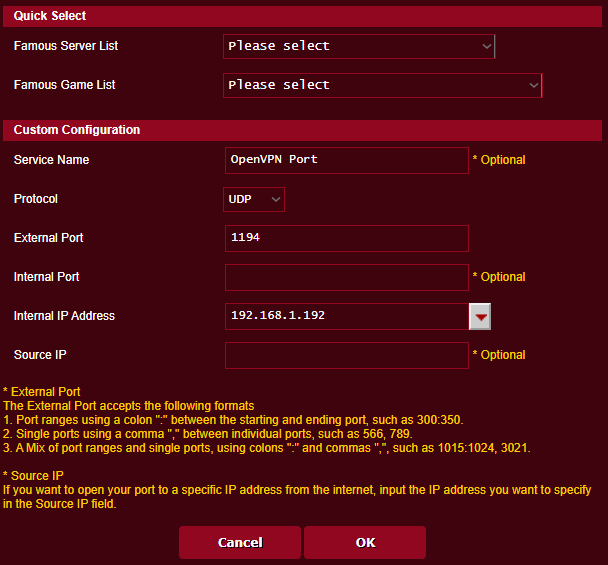
Step 5: Port forwarding OpenVPN at your router
For this step, I am unable to show you how it is done all router models as there are different kinds of routers. However, the steps are the same. You have to find the location of the port forward setting in your router. You can find more information by visiting your router manufacturer website and downloading the user manual.
What is required?
- Select the OpenVPN external port [default = 1194]
- Select the OpenVPN correct protocol [default = UDP]
- Select the OpenVPN internal IP address [OpenVPN server local IP address]

Step 6: Setting up the OpenVPN client
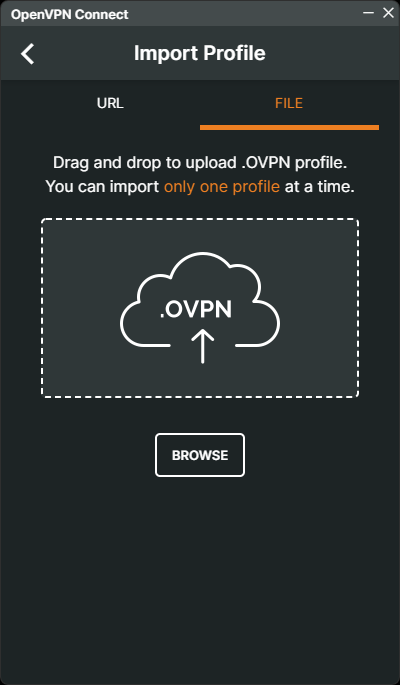
Install the OpenVPN client on the client device. You need to import the .ovpn configuration file into the OpenVPN client.

Once imported, you can test it by connecting to a public Wi-Fi or a mobile hotspot. Then, connect to your VPN server.

Adding and revoking clients
To add and revoke clients, re-run the script again.
sudo ./openvpn-install.shTroubleshoot
If you are unable to get your OpenVPN working, please try the following:
- Check the VM interface. This guide is created with bridging network settings.
For NAT, there will be another configuration to be done.
However, this not recommended due to double NAT, one from your router and one from your virtualization software. - If you are not using SSH, check if the VM is pingable?
- Check your Port Forward setting. Visit your router manufacturer website and read the user manual of your router model.
- Is your home using a dynamic IP address? Once your public IP address has changed, you will need to reconfigure the
.ovpnfile again. - Is your client connected to the internet?
I hope this guide helps you with your OpenVPN setup.

