Nginx Proxy Manager, A Reverse Proxy Management System
In this post,
- What is a reverse proxy and why use it?
- What is Nginx Proxy Manager?
- Installing the Nginx Proxy Manager
- How to set up a reverse proxy?
What is a reverse proxy and why use it?
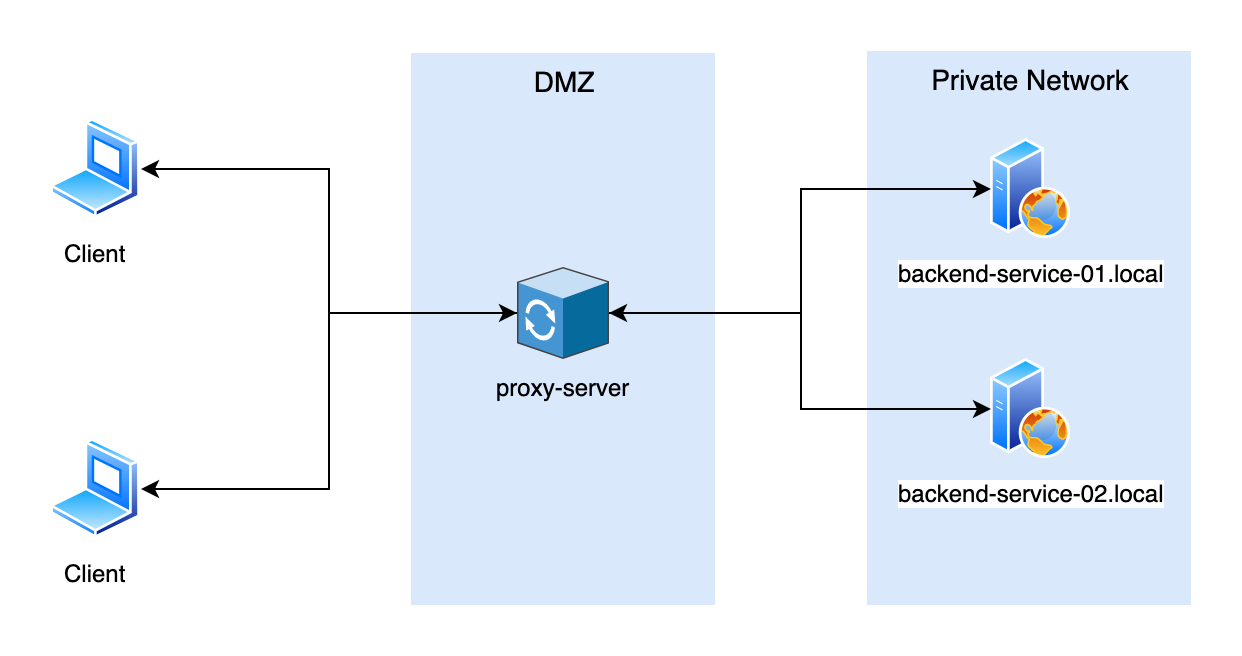
The purpose of a Reverse Proxy Server is to redirect web traffic to the requested server hosting behind it. This allows multiple web applications to be hosted and exposed to the public by using just one public IP address and one port, mainly 443.
However, this can only be done with a Domain Name. It must be configured in the Nginx Virtual Host configuration file with the server IP address and port. The client will never know the real IP address and port number of the server.
Lastly, the SSL/TLS certificate can be easily managed and renewed at a reverse proxy for all the hosted domain names. The SSL can be configured to be terminated at the reverse proxy and forward the unencrypted data to the server. This allows better performance for the backend servers where decryption is not needed on their end.

For local web applications that require a port number to access the web portal, Nginx Proxy Manager also allows you to connect to the local web application without the port number.
This can be done by setting a local DNS entry myapp.home at the DNS server to point to the reverse proxy IP address. The reverse proxy server will forward that traffic to the myApp server at 192.168.1.100:8006.

server {
    listen 80;
    server_name myapp.home;
    ...
    ...
    location / {
        proxy_pass http://192.168.1.100:8006;
    }
}What is Nginx Proxy Manager?
It is a web-based GUI tool that is based on Nginx, a web server, to host the Web UI and perform as a reverse proxy server. It comes with a clean and nice UI that is easy to navigate around.
It comes as a pre-built docker image that enables you to easily forward to your websites running at home or otherwise, including SSL management, without having to know too much about Nginx or Letsencrypt.
This helps you to spend lesser time configuring the reverse proxy configuration file and shift your focus more on the web application that you want to deploy.

Installing the Nginx Proxy Manager
Install Docker
The quickest way to install is to use a docker image. Install docker and docker-compose first.
apt install docker docker-composeInstall Nginx Proxy Manager
Make a new directory for the docker container at your home directory and enter the directory.
mkdir ~/nginx-proxy-managercd ~/nginx-proxy-managerCreate a new docker-compose.yml file.
nano docker-compose.ymlAdd the following lines into the docker-compose.yml file.
version: '3'
services:
  app:
    image: 'jc21/nginx-proxy-manager:latest'
    restart: unless-stopped
    ports:
      - '80:80'
      - '81:81'
      - '443:443'
    volumes:
      - ./data:/data
      - ./letsencrypt:/etc/letsencrypt
Run the docker image.
docker-compose up -d
Once the download is completed and the image is running, log in to the webpage at http://127.0.0.1:81. If you are logging in for another computer, replace 127.0.0.1 with the IP address of the Nginx Proxy Manager server.
Emailadd: [email protected]
Password: changeme

Change your account details once you successfully log in. Make sure to change your password to a secure password.
How to set up a reverse proxy?
In the example below, I have set up a webserver on 192.168.1.192 at port 80 and called it myapp.
Navigate to the proxy host page, add a new proxy host with the server IP and port number of that web application.
I will set a domain myapp.home, with the IP address and the port number of the myapp is hosted. For the Access List, the client IP must belong to Home Network to gain access to it.

Setting up local DNS A name record for myapp.home
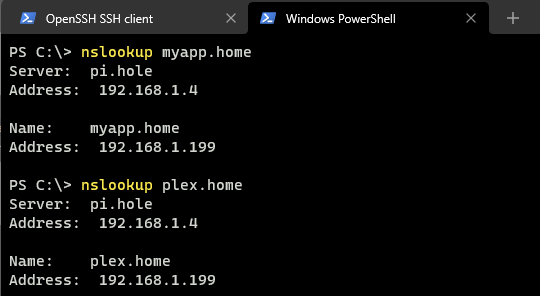
My local Pi.Hole DNS server will be pointing myapp.home to this Nginx Proxy Manager IP address. In addition, I also have a Plex Media Server, that is pointing to the same Proxy IP, where the client will never know what is the real IP address of both places.


myapp.home is now pointing to the Nginx Reverse Proxy IP address. Of course, myapp is not hosted at 192.168.1.199 but it is at 192.168.1.192.
Hosting web application to the public
You need a domain name for this.
For this example, I will be using demo.fscene8.xyz. At my DNS provider, I have set the DNS record to point to my Nginx Proxy Manager Public IP address. I will also grab an SSL cert and change from plain HTTP to HTTPS.

Let's Encrypt
Change to the SSL tab, select Request a new SSL certificate and turn on Force SSL. Enter your email address and agree to the Terms of Service. Click Save.


demo.fscene8.xyz proxy host summary I have just created an SSL cert for demo.fscene8.xyz and encrypts the traffics between the client and the proxy server. The SSL termination will be done at my proxy server and forwards the unencrypted traffic back to 192.168.1.192:80.
Let's check out the new site
Navigate to the site and check the cert.

